
Butterfly Biodata:
Genus: Remelana Moore, 1884
Species: jangala Horsfield, 1829
Subspecies: travana Hewitson, 1865
Wingspan of Adult Butterfly: 31-35mm
Caterpillar Local Host Plants: Ixora 'Super Pink' hybrid/cultivar. of Ixora chinensis (Rubiaceae, common name: Ixora, chinese name: 龙船花), Eurya acuminata (Theaceae, chinese name: 尖叶柃).


 A female Chocolate Royal.
Physical Description of Adult Butterfly:
On the upperside, the male is deep lustrous purple with broad brown border on both wings; the female is paler purple and different from the male in having basal areas of spaces 2 and 3 entirely purple. On the underside, both sexes are brown with conspicuous cell-end bars and post-discal series of dark brown striae on both wings. The prominent black tornal spot and the black marginal spot in space 2 are bothcrowned with brilliant metallic green/blue scaling. Between and beyond the two spots, the marginal area of spaces 1a, 1b and 3 is also covered with same metallic scaling. There are two pairs of white-tipped tails at the end of veins 1b and 2.


Field Observations:
This species is moderately rare in Singapore and can be found in forested areas of the nature reserves. There are also infrequent sightings of this species in urban parks and gardens. Adults are fast flyers and make rapid sorties among foliage. Both sexes have been observed to visit flowers of various plants for nectar. The male has also been observed to puddle on wet grounds.


Early Stages:
Two local host plants have been recorded for the Chocolate Royal. They are Eurya acuminata and Ixora 'Super Pink'. Caterpillars of the Chocolate Royal feed on the flowers, flower buds, and young and tender leaves of the host plants. In the wild, the caterpillars are found in the company of attending ants.
5th instar caterpillar and the pre-pupa of Chocolate Royal being attended by ants.
 Local host plant #1: Ixora 'Super Pink'.
 Local host plant #2: Eurya acuminata.
The eggs are laid singly on the underside of leaves, young shoots, on or in the vicinity of flower buds of the host plants. Each egg is about 0.7-08mm in diameter, white with a strong greenish tinge when freshly laid. It is burger-shaped with a depressed micropylar at the pole and a surface reticulated with rather large polygonal depressions.
 Two views of an egg of the Chocolate Royal, laid on leaf underside.
 An egg of the Chocolate Royal laid on the flower bud of Ixora 'Super Pink'.
It takes about 3 days for the egg to hatch. The caterpillar nibbles away the polar portion of the egg shell to emerge, and does not eat the egg shell remnant. The newly hatched is pale yellowish with lateral orangy brown bands running lengthwise. Its body has a length of about 1.3mm and has long setae dorso-laterally and laterally. The prothoracic shield are both pale brown. Typically the newly hatched finds its way to adjacent flower buds, feeding on the peduncle or the bud proper where it will bore a hole to reach the flower parts within. After about 3 days of growth in the first instar, and reaching a length of about 2.5-2.7mm, the caterpillar moults to the next instar.
 Two views of a 1st caterpillar, newly hatched, length: 1.3mm.
 Two views of a 1st instar caterpillar, length: 2mm.
 An early 1st instar caterpillar eating away the peduncle (flower stalk) of an Ixora flower.
In the 2nd instar caterpillar, the prothoracic shield and the head are both black, a significant change from the earlier pale brown coloration. The body still features reddish brown lateral bands and bear numerous short fine setae on its surface. On the dorsum of the 7th abdominal segment, the dorsal nectary organ is present but still inconspicuous. The 2nd instar caterpillar reaches a length of about 3.6-3.9mm, and after about 3 days in this stage, it moults again.
 Two views of a 2nd instar caterpillar, newly moulted, eating its exuvia, length: 2.5mm.
 Two views of a 2nd instar caterpillar, length: 3mm.
 A 2nd instar caterpillar of the Chocolate Royal on a young shoot of Ixora 'Super Pink'.
The 3rd instar caterpillar loses the contrasting lateral brown bands in the previous instars. Its body is now uniformly coloured in pale yellowish brown to pale green. The prothoracic shield and the head retains the black coloration. The dorsal nectary organ is now more conspicuous and has a short bar-like appearance. There is no visible sign of any tentacular organs (common in many other lycaenid species) on the 8th abdominal segment. The 3rd instar takes about 3 days to complete with the body length reaching about 6.5-7mm.
 Two views of a 3rd instar caterpillar, length: 5.5mm.
 Two views of a late 3rd instar caterpillar, length: 7mm.
 An early 3rd instar caterpillar of the Chocolate Royal boring a hole on the flower bud of Ixora 'Super Pink'.
The 4th instar caterpillar resembles the 3rd instar closely. Its body is still yellowish green to dull green, covered with numerous tiny setae. The black coloration of the prothoracic shield is retained in some specimens but changed to a brown to pale brown coloration in others. The bar-like dorsal nectary organ is marked with two reddish brown marks around a central white speck, giving it a prominent appearance. The 4th instar takes about 3 days to complete with the body length reaching 12.5-13mm.
 Two views of an early 4th instar caterpillar, length: 7.5mm.
 Two views of a late 4th instar caterpillar, length: 12.5mm.
 A 4th instar caterpillar of the Chocolate Royal feeding on an Ixora flower.
 A 4th instar caterpillar of the Chocolate Royal feeding on an flower bud of Eurya acuminata.
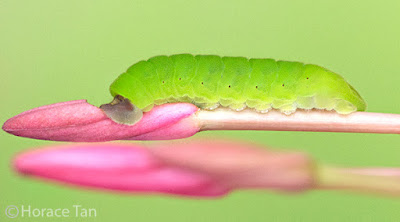
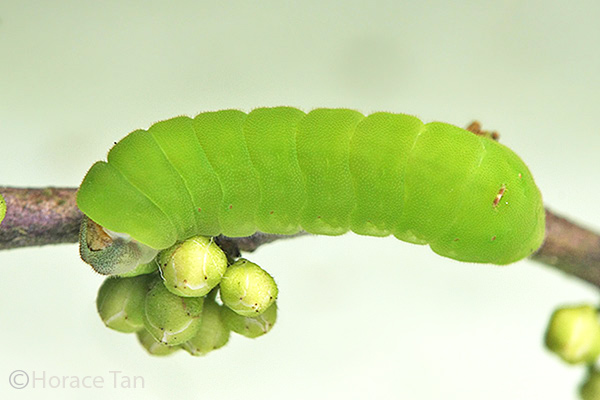
The 5th instar caterpillar has similar markings as in the 4th instar. The body colour takes on a brighter shade of yellowish green and the prothoracic shield, together with rest of the prothorax, has faded further to pale yellowish brown. When an ant approaches, the dorsal nectary organ can be observed to protrude and exude droplets of clear nectary fluid.
 Two views of a newly moulted 5th instar caterpillar, length: 12mm.
 Two views of a 5th instar caterpillar, late in this stage, length: 20.5mm.
 Close-up view of the prothorax and the dorsal nectary organ of a 5th instar caterpillar of the Chocolate Royal. Lower left: dorsal nectary organ; lower right: the prothorax.
 A 5th instar caterpillar of the Chocolate Royal eating flower buds of Eurya acuminata.
 A 5th instar caterpillar of the Chocolate Royal eating flower buds of Ixora 'Super Pink'.
After about 5-6 days of feeding and reaching a length of about 21-23mm, the caterpillar stops food intake and wanders around for a pupation site. During this time, its body gradually shortened. Typically the caterpillar chooses a site on the sheltered surface of a leaf for its pupation site.
 An ant triggers the protrusion of the dorsal nectary organ of a Chocolate Royal caterpillar and reaping its reward.
The dark jade-green pre-pupatory caterpillar prepares for pupation by spinning a silk girdle and a silk pad to which it attaches itself via anal claspers. After about 1 day as a pre-pupa, pupation takes place. The pupa is predominantly jade green and has numerous small whitish speckles. Pupal length: 12-13mm. The stout pupa has a typical lycaenid shape with a short abdomen.
 Two views of a pre-pupa of the Chocolate Royal.
 Two views of a pupa of the Chocolate Royal.
Six to seven days later, the pupa turns black, mostly in the thorax and wing pads. The bluish patch on the forewing upperside of the adult can now be seen in the wing pads. The next day, the pupal stage comes to an end with the emergence of the adult butterfly.
 Two views of a mature pupa of a Chocolate Royal.
 A newly eclosed Chocolate Royal.
References:
Genus: Remelana Moore, 1884
Species: jangala Horsfield, 1829
Subspecies: travana Hewitson, 1865
Wingspan of Adult Butterfly: 31-35mm
Caterpillar Local Host Plants: Ixora 'Super Pink' hybrid/cultivar. of Ixora chinensis (Rubiaceae, common name: Ixora, chinese name: 龙船花), Eurya acuminata (Theaceae, chinese name: 尖叶柃).


Physical Description of Adult Butterfly:
On the upperside, the male is deep lustrous purple with broad brown border on both wings; the female is paler purple and different from the male in having basal areas of spaces 2 and 3 entirely purple. On the underside, both sexes are brown with conspicuous cell-end bars and post-discal series of dark brown striae on both wings. The prominent black tornal spot and the black marginal spot in space 2 are bothcrowned with brilliant metallic green/blue scaling. Between and beyond the two spots, the marginal area of spaces 1a, 1b and 3 is also covered with same metallic scaling. There are two pairs of white-tipped tails at the end of veins 1b and 2.


Field Observations:
This species is moderately rare in Singapore and can be found in forested areas of the nature reserves. There are also infrequent sightings of this species in urban parks and gardens. Adults are fast flyers and make rapid sorties among foliage. Both sexes have been observed to visit flowers of various plants for nectar. The male has also been observed to puddle on wet grounds.


Early Stages:
Two local host plants have been recorded for the Chocolate Royal. They are Eurya acuminata and Ixora 'Super Pink'. Caterpillars of the Chocolate Royal feed on the flowers, flower buds, and young and tender leaves of the host plants. In the wild, the caterpillars are found in the company of attending ants.
5th instar caterpillar and the pre-pupa of Chocolate Royal being attended by ants.


The eggs are laid singly on the underside of leaves, young shoots, on or in the vicinity of flower buds of the host plants. Each egg is about 0.7-08mm in diameter, white with a strong greenish tinge when freshly laid. It is burger-shaped with a depressed micropylar at the pole and a surface reticulated with rather large polygonal depressions.


It takes about 3 days for the egg to hatch. The caterpillar nibbles away the polar portion of the egg shell to emerge, and does not eat the egg shell remnant. The newly hatched is pale yellowish with lateral orangy brown bands running lengthwise. Its body has a length of about 1.3mm and has long setae dorso-laterally and laterally. The prothoracic shield are both pale brown. Typically the newly hatched finds its way to adjacent flower buds, feeding on the peduncle or the bud proper where it will bore a hole to reach the flower parts within. After about 3 days of growth in the first instar, and reaching a length of about 2.5-2.7mm, the caterpillar moults to the next instar.


In the 2nd instar caterpillar, the prothoracic shield and the head are both black, a significant change from the earlier pale brown coloration. The body still features reddish brown lateral bands and bear numerous short fine setae on its surface. On the dorsum of the 7th abdominal segment, the dorsal nectary organ is present but still inconspicuous. The 2nd instar caterpillar reaches a length of about 3.6-3.9mm, and after about 3 days in this stage, it moults again.


The 3rd instar caterpillar loses the contrasting lateral brown bands in the previous instars. Its body is now uniformly coloured in pale yellowish brown to pale green. The prothoracic shield and the head retains the black coloration. The dorsal nectary organ is now more conspicuous and has a short bar-like appearance. There is no visible sign of any tentacular organs (common in many other lycaenid species) on the 8th abdominal segment. The 3rd instar takes about 3 days to complete with the body length reaching about 6.5-7mm.


The 4th instar caterpillar resembles the 3rd instar closely. Its body is still yellowish green to dull green, covered with numerous tiny setae. The black coloration of the prothoracic shield is retained in some specimens but changed to a brown to pale brown coloration in others. The bar-like dorsal nectary organ is marked with two reddish brown marks around a central white speck, giving it a prominent appearance. The 4th instar takes about 3 days to complete with the body length reaching 12.5-13mm.


The 5th instar caterpillar has similar markings as in the 4th instar. The body colour takes on a brighter shade of yellowish green and the prothoracic shield, together with rest of the prothorax, has faded further to pale yellowish brown. When an ant approaches, the dorsal nectary organ can be observed to protrude and exude droplets of clear nectary fluid.


After about 5-6 days of feeding and reaching a length of about 21-23mm, the caterpillar stops food intake and wanders around for a pupation site. During this time, its body gradually shortened. Typically the caterpillar chooses a site on the sheltered surface of a leaf for its pupation site.

The dark jade-green pre-pupatory caterpillar prepares for pupation by spinning a silk girdle and a silk pad to which it attaches itself via anal claspers. After about 1 day as a pre-pupa, pupation takes place. The pupa is predominantly jade green and has numerous small whitish speckles. Pupal length: 12-13mm. The stout pupa has a typical lycaenid shape with a short abdomen.


Six to seven days later, the pupa turns black, mostly in the thorax and wing pads. The bluish patch on the forewing upperside of the adult can now be seen in the wing pads. The next day, the pupal stage comes to an end with the emergence of the adult butterfly.


References:
- [C&P4] The Butterflies of The Malay Peninsula, A.S. Corbet and H.M. Pendlebury, 4th Edition, Malayan Nature Society, 1992.
- Butterflies of Thailand, Pisuth Ek-Amnuay, 2nd Edition, 2012.
- A Field Guide to the Butterflies of Singapore, Khew S.K., Ink On Paper Communications, 2nd Edition, 2015.


